FAQ / Longarmer Locator
1 . Is it secure to place an order through your site?
You can place your order online with complete confidence in the safety of your personal and credit card information. This information is only used to process your order. We will never sell, trade or distribute your personal information without your prior consent.
2 . How do I reset my password?
On our Log-In page, click on the message "Forgot your password?" You will be prompted to enter your e-mail address. Once you enter your e-mail address you will receive an e-mail with a link to reset your password. If you have further issues, call us at 830.964.6133.
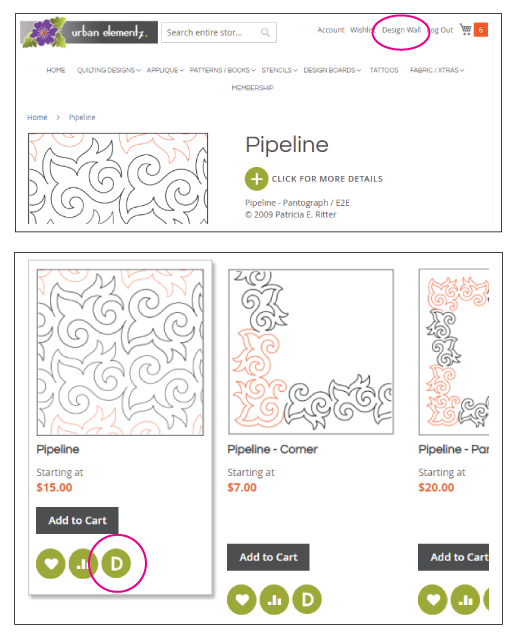
3 . How do I find the Design Wall?
Once logged in as a customer, the Design Wall can be accessed from anywhere on our site by clicking "Design Wall" at the top of the webpage. Quickly add any quilting design to the Design Wall by clicking the product's "D" icon on either the category or product pages.
Once you are in the Design Wall, you can upload photos of your quilts, layout, resize & rotate different quilting designs, and even change the thread color!
4 . Where are my downloadable purchases located in MY ACCOUNT?
Your downloadable purchases are always available through your Urban Elementz and Applique Elementz accounts.
- Log into your account.
- On your account page is a link for "My Downloadable Products"
- Click the design name/link that is in blue to access your purchases
5 . What is your copyright information?
COPYRIGHT DISCLOSURE:
You are purchasing a non-exclusive, revocable, non-transferable personal license to reproduce the pattern(s) included in your purchase (“Licensed Patterns”).
Your use of the Licensed Patterns under this license is conditioned upon your strict compliance with the conditions stated below. If you do not comply with the
conditions stated below, the license you purchased shall be and hereby is revoked without any further action by Urban Elementz. Thus, any and all uses of the
Licensed Patterns which does not comply with the following conditions is an unauthorized use of the Licensed Patterns and constitutes an infringement of the
copyright(s) protecting the Licensed Patterns and breach of this license granted herein.
Conditions:
This license is a personal license. It permits only one person to create one or more quilts or other fabric-based finished goods incorporating one or more of the
Licensed Patterns (collectively, “Finished Goods”). The person who first creates one or more Finished Goods is the person to whom the license applies
(“Licensed Person”). Thereafter, only the Licensed Person may create Finished Goods under the license you purchased and the license may not be transferred
to any other person without written permission from Urban Elementz.
Any company, commercial business entity, or organization that wishes to reproduce, distribute, sell or otherwise use any Licensed Pattern or Finished Good must
contact Urban Elementz to obtain permission.
Any and all Finished Goods entered in a public venue must bear, on a conspicuous label attached to the Finished Goods, proper copyright notice and the individual
author’s name (or authors’ names) of each author who created the Licensed Pattern(s) incorporated into the Finished Good. Information for proper copyright notice
and identifying the author(s) who created the Licensed Pattern(s) included in your purchase should be provided by Urban Elementz, at the time of purchase or on
Urban Elementz’ website www.urbanelementz.com; however, if Urban Elementz does not provide such information, it is your responsibility to contact Urban Elementz
and request same in writing. Urban Elementz’ failure to provide such information, regardless of whether such information is requested or otherwise, shall not constitute
an excuse for you not including the proper copyright notice and the name of the author or authors who created the Licensed Pattern(s) in any Finished Goods you create.
This condition also applies to any and all displays of Finished Goods and/or any Licensed Patterns in any and all tangible mediums of expression other than fabric,
including but not limited to photographs of Finished Goods, printed publications of Finished Goods, and/or displays of Finished Goods on social media, websites,
or otherwise.
No Licensed Pattern, or any part thereof, may be used in any way or form whatsoever (e.g., paper & digital pantographs/patterns/books/applique/decals/stencils) or
reproduced by any means - graphic, electronic, or mechanical, including photographing, photocopying, recording or taping, without providing proper copyright notice
and without providing the name of the individual or individuals who authored the Licensed Pattern(s).
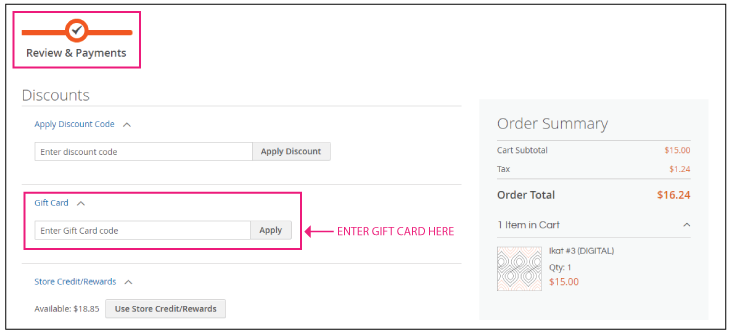
6 . How do I redeem a gift certificate?
During checkout, enter your gift cerificate number in the text box labeled "GIFT CARD" found on the REVIEW & PAYMENT page.
7 . Can I exchange my paper pantographs for the digital version?
Unfortunately, since we can't re-sell a previously owned pantograph, and with consideration of production and royalty costs, we don't have any program in place for those wanting to convert their paper to digital. But as an individual, you can post your paper pantos for sale in the various online chat rooms. We have seen a number of people do this, and they usually sell their pantos quite quickly.
8 . How do I leave a review?
To leave feedback about Urban Elementz:
We strive to provide excellent service for our customers and your feedback helps us to accomplish this. We would greatly appreciate it if you would consider taking a moment to rate our company on Google by following this link: Urban Elementz - Google Review